Background
This article explores the concept of a monorepo, delving into its definition, when it becomes essential, and the reasons behind tech giants such as Google, Facebook, and Microsoft adopting it for their projects. Additionally, I'll guide you through the process of developing an application using Postgres, Prisma, and Nest JS within a monorepo.
Fast Forward: You will be able to use your service just like a NPM package without publishing it to NPM.
What will we learn?
- What is monorepo
- Why monorepo
- Create monorepo with Nx
- Setup postgres and prisma
- Create prisma library using Nx
- Consume prisma module inside NestJS
- Some quick tips
What is Monorepo
Monorepo is a single repository containing multiple distinct projects, with well-defined relationships.
Most of the application development employ polyrepo i.e. each project/application/package has its own repo and they communicate with each other via different mechanisms
On the other hand, we can set up a monorepo that incorporates all the applications and/or packages. Each of these packages have their own purpose and can be used and maintained across the applications with ease and can also be published as a NPM package.
Why Monorepo
Handling a Polyrepo in large projects with numerous developers can be challenging and may introduce unnecessary complications. Let's point out some of the drawbacks of Polyrepo:
- Cumbersome code sharing - Setup tooling, CI, Env, Versioning issues
- Significant code duplication - Own way of solving problems. Even same utility function may need a modification
- Costly cross-repo changes to shared libraries and consumers - Bug or critical change in a shared library
- Inconsistent tooling - Each project can have it's own linting, testing, building, deploying tools
And here's how Monorepo can solve these issues
- No overhead to create new projects - Use existing CI setup. No need to publish packages if they are all in the same repo.
- Atomic commits across projects - No breaking commits
- One version of everything - No incompatibility issues in versions of third party libraries
- Developer mobility - Consistent way way of setting up, building, and testing application across the developers
You can go deeper into theories at https://monorepo.tools/#why-a-monorepo
Enough of theories? Let's create some magic!
Create Monorepo with Nx
As per the official documentation, "Nx is a build system with built-in tooling and advanced CI capabilities. It helps you maintain and scale monorepos, both locally and on CI"
Lets create our monorepo with the following command:
npx create-nx-workspace
It will ask the following questions to set up a repo.You can choose your own tech stack while working on your projects.
- Where to create workspace => PROJECT_ROOT (Eg: nx-demo)
- Which stack => Node
- Which framework => Nest
- Integrated or Standalone => Integrated
- App name => Name of NestJs app (Eg: nest-backend)
- Add dockerfile => Yes/No (Any)
- Enable distributed caching => Yes
You should have something like this on your screen and the nest-backend app would be located inside the apps directory.
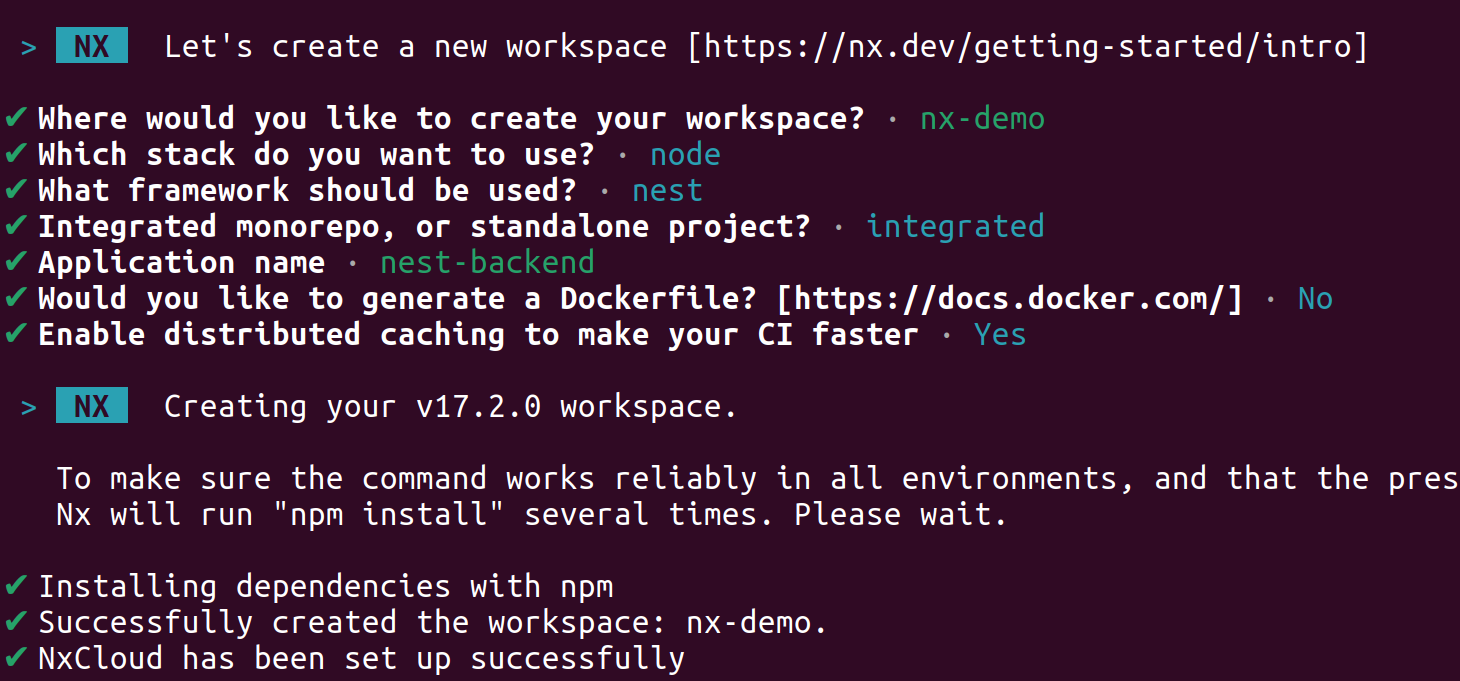
Fig: CLI result of nx workspace command
Now, lets change our working directory to PROJECT_ROOT and run backend service with nx command as follows:
npx nx serve nest-backend
You will see you API server running at port http://localhost:3000/api
So far so good? Lets create a database service as a library and use it inside our backend app.
Set up Postgres and Prisma
In this tutorial we are going to use Postgres as a database and Prisma as an ORM. So before we move on to prisma, make sure you have Postgres database up and running. If you do not have Postgres installed, just create a docker-compose file and paste the following code.
version: '3.8'
services:
  dev-db:
    image: postgres:13
    volumes:
      - db_data:/data/db:ro
    ports:
      - 5434:5432
    environment:
      POSTGRES_USER: demo
      POSTGRES_PASSWORD: demo123
      POSTGRES_DB: demo_db
    networks:
      - my_app
networks:
  my_app:
volumes:
  db_data:
Then, run the DB service using the docker command: docker compose up dev-db -d
Moving on, lets install some dependencies required for prisma module
npm install prisma
npm install --save-dev @prisma/client
After installing the package, let's initialize a prisma that will provide us a schema file and environment file where we can place our database URL.
Run npx prisma init inside the project root and go to the .env file to replace the database URL. As per our docker compose file, database URL should be;
DATABASE_URL="postgresql://demo:demo123@localhost:5434/demo_db?schema=public"
Lets create our schema to store product details as an example. Go to prisma/schema.prisma file and paste the code below:
model Product {
  id        Int       @unique @default(autoincrement())
  name      String    @db.VarChar() @unique
  price     Int
  createdAt DateTime  @default(now())
  updatedAt DateTime? @updatedAt()
  @@map("products")
}
Great!! We have set up our database and prisma schema. But, the schema model is only inside our project file till now. Lets run a migration script that executes a SQL command to create a table inside Postgres DB.
npx prisma migrate dev
*Note: You should this script for every change inside schema model.
Create prisma library using Nx
This is the most important part for Nx. We are going to use a library/package for database service i.e. prisma which we can use across multiple projects without any setup hassle. This is just an example of database module, you can build and implement any logical library similarly.
Let's create a NestJs based module using Nx CLI using the command:
npx nx g @nx/nest:library prisma-db --directory=libs/prisma-db
This will create a prisma-db package inside libs direcotry with all the neccessary to work as a package. Inside this package, we will write a code that will connect our application with given DATABASE_URL and export the prisma client so that we will be able to run queries from our application
Go to libs/prisma-db/src/lib/prisma.service.ts and paste the following code.
import { Injectable, OnModuleInit } from '@nestjs/common';
import { PrismaClient } from '@prisma/client';
@Injectable()
export class PrismaService extends PrismaClient implements OnModuleInit {
  async onModuleInit() {
    await this.$connect();
  }
}
If you have reached so far, the magic is about to happen.Till now, we have set up the monorepo, added a NestJS based backend app, set up a postgres and prisma along with schema and created a reuseable database connect/access library which is based upon Nest JS. And the final part is consuming the library.
Consume prisma DB library inside NestJs
In order to use prisma service inside our nest-backend, let's go back to project_root/apps/nest-backend/src directory and find a file named app.module.ts
Now, we can import PrismaDbModule and PrismaService from @nx-demo/prisma-db how cool is that ;) So, our app.module.ts file looks like this:
import { Module } from '@nestjs/common';
import { AppController } from './app.controller';
import { AppService } from './app.service';
import { PrismaDbModule, PrismaService } from '@nx-demo/prisma-db';

@Module({
  imports: [PrismaDbModule],
  controllers: [AppController],
  providers: [AppService, PrismaService],
})
export class AppModule {}
Finally, we can use PrismaService inside our app.service.ts file and perform database queries on product table as follows:
import { Injectable } from '@nestjs/common';
import { PrismaService } from '@nx-demo/prisma-db';

@Injectable()
export class AppService {
  constructor(private prisma: PrismaService) {}
  getData() {
    return this.prisma.product.findMany();
  }

  addProduct(dto: any) {
    return this.prisma.product.create({ data: dto });
  }
}
To connect this business logic with API endpoint, let's go to the app.controller.ts file and replace with the code:
import { Body, Controller, Get, Post } from '@nestjs/common';
import { AppService } from './app.service';

@Controller('products')
export class AppController {
  constructor(private readonly appService: AppService) {}

  @Get('')
  getData() {
    return this.appService.getData();
  }

  @Post('')
  addProduct(@Body() dto: any) {
    return this.appService.addProduct(dto);
  }
}
And all set! (You know where it comes from ;)
To test our API endpoints, we can post product details (name,price) at http://localhost:3000/api/products with POST method and get the list with GET method.
Damn! writing this article in one go feels like a win. And if you have managed to read it so far and found it to be useful, It's definitely a win.
Some Quick Tips
- Don't over use it, know your use case
- Don't over-complicate with multiple databases
- Establish a clear and consistent directory structure
- Keep dependencies up-to-date and leverage version ranges intelligently
- Encourage developers to make atomic commits that represent a single logical change
- Implement Unit/E2E testing
- Maintain comprehensive documentation to help developers understand the structure of the monorepo, project dependencies, and any specific workflows.
Github Repo: https://github.com/thebinod7/nx-fullstack-demo
Happy Coding!
Binod Chaudhary

Software Engineer | Full-Stack Developer